
Overview
Installing and setting up Proxmox is easy enough, but there are several steps that I follow each time – if I remember – to make each instance look, feel and behave as I want them to. I do the following: –
- Update apt, the operating system version, etc.
- Change the update repositories for Proxmox and Ceph.
- Update Proxmox.
- Update hostnames, DNS, etc.
- Set up storage such as HDD and SSD with consistent names.
- Attach NFS shares for backups, ISOs and Disks/Templates.
- Enable VLAN functionality – my network has several VLANs as I have a lot of IOT devices; the family have their devices and aren’t that careful about what they install on them.
- Enable and test email alerts (see Configuring Email Alerts on Proxmox)
Update everything to the latest version
The first thing I do is update everything to the latest versions, including updating Proxmox itself.
I execute the following commands and then reboot the system: –
apt-get update -y
apt dist-upgrade
reboot
Once the system reboots, I use the built-in functionality of Proxmox to update Proxmox itself.
When Proxmox is installed, it includes repositories where it will look to find updates. From time to time, it scans these and reports that updates are available. There are two repositories: an enterprise repository, which requires a paid subscription and a No-Subscription repository. I stick with the No-Subscription repository because it seems stable, and I run these things in my home lab, so I can handle downtime if necessary.
The first thing I do is to update the list of repositories to remove the Enterprise subscription and enable the No-Subscription one.
I edit a file called /etc/apt/sources.list.d/pve-enterprise.list and put a ‘#’ on the front of the enterprise repo as shown below: –
# deb https://enterprise.proxmox.com/debian/pve bookworm pve-enterpriseNote that, depending on the version of Proxmox you install, the ‘bookworm’ name will be different.
Then I added the No-Subscription repository by creating a new file called /etc/apt/sources.list.d/pve-no-enterprise.list and adding the following to it: –
deb http://download.proxmox.com/debian/pve bookworm pve-no-subscriptionAgain, note that ‘bookworm’ may need to be updated depending on the version in place at the time. Then, rerun the following commands.
apt-get update -y
apt dist-upgrade
reboot
The screenshot below shows the repositories in the Proxmox UI: –
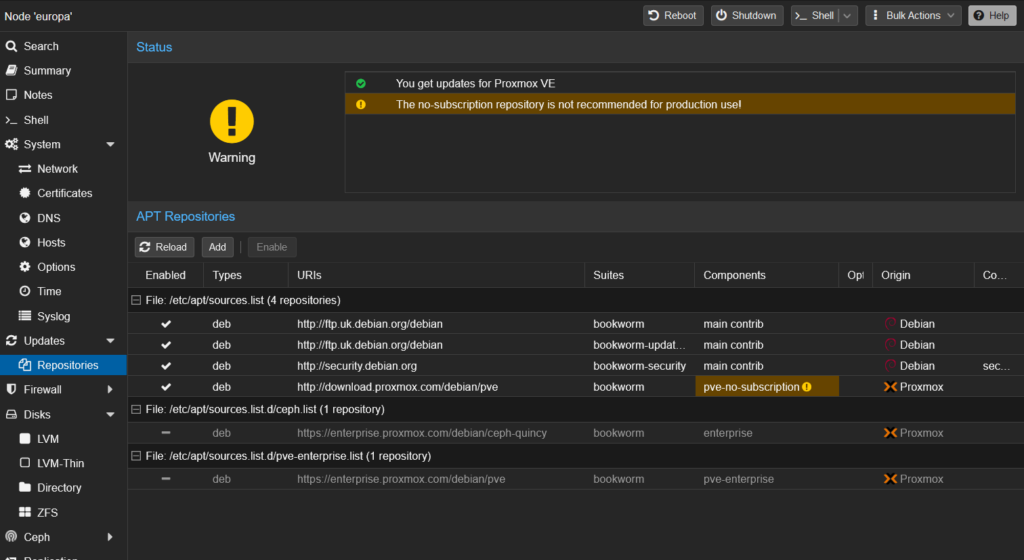
The big warning sign is that we are using the No-Subscription repository and not the Enterprise one.
By clicking on the ‘Updates’ section on the left, we can see the Updates (if any) listed that need to be applied as shown below: –
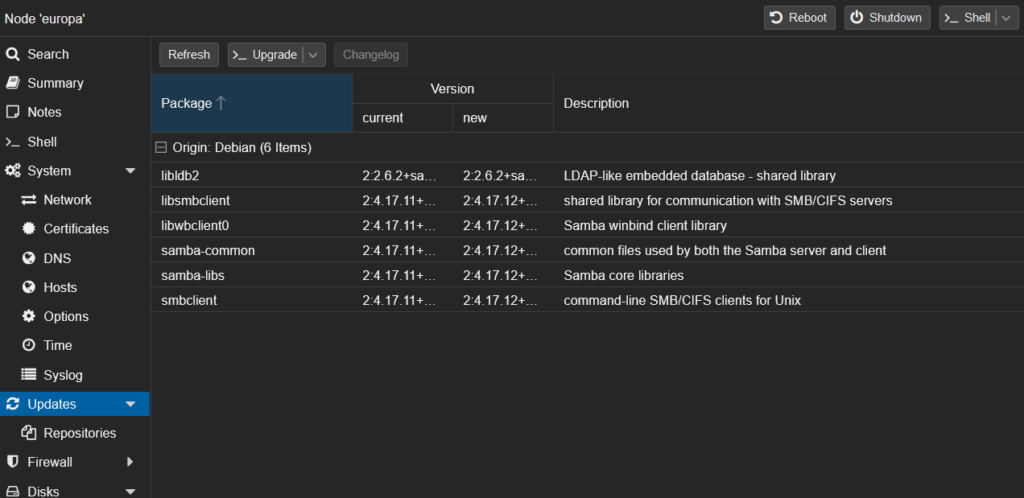
You can click ‘Refresh’ to force Proxmox to scan your system and compare its version with those in the No-Subscription repository. It will list any available updates below, and you can click the ‘Upgrade’ button to apply them. In most cases, once the updates have been applied, you will be prompted to reboot the system. I always either stop any running containers and VMs and reboot or move them to another host and then reboot. I have never rebooted while things are still running, but I would assume Proxmox will either shut them down or suspend them.
The screenshot below shows a popup window when you apply the updates. It is a normal Shell window that asks you to confirm before they are applied.
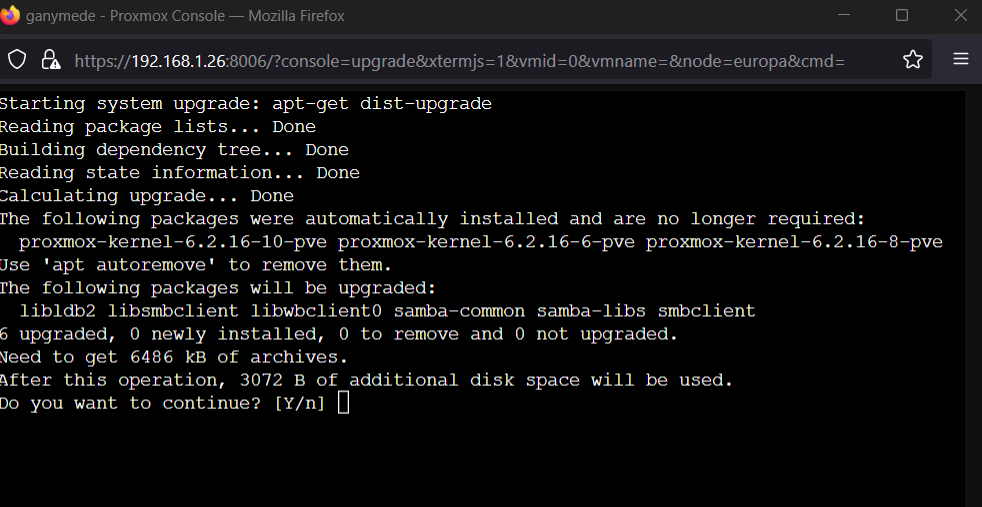
If you answer ‘Y’, it will download and apply updates. Don’t forget to reboot once the updates are complete.
Storage
There are many different ways of installing and configuring storage on a Proxmox server. As I only have a relatively small number of physical machines (10 at the moment, but I only typically use about half of them), I normally install storage locally. I install a small SSD for the operating system (typically 120 or 250GB), and I use hardware RAID cards in the machines for everything else. I usually install a few HDDs in RAID10 for backups and moving data around, and the rest (typically 10+ SSDs) are again in a RAID10 array for performance reasons.
I have automated backups for every machine. This means my Compute servers can be wiped and reinstalled at any time – albeit a pain – and I can simply restore VMs and containers as needed.
When setting up storage on individual servers, you must understand that you will likely lose data on the disk you provision. So, if you need something from the disks, back them up before continuing or be very careful not to overwrite them.
Local Storage
The disks section shown below is where your installed disks appear and where you can wipe them and assign them to specific uses: –
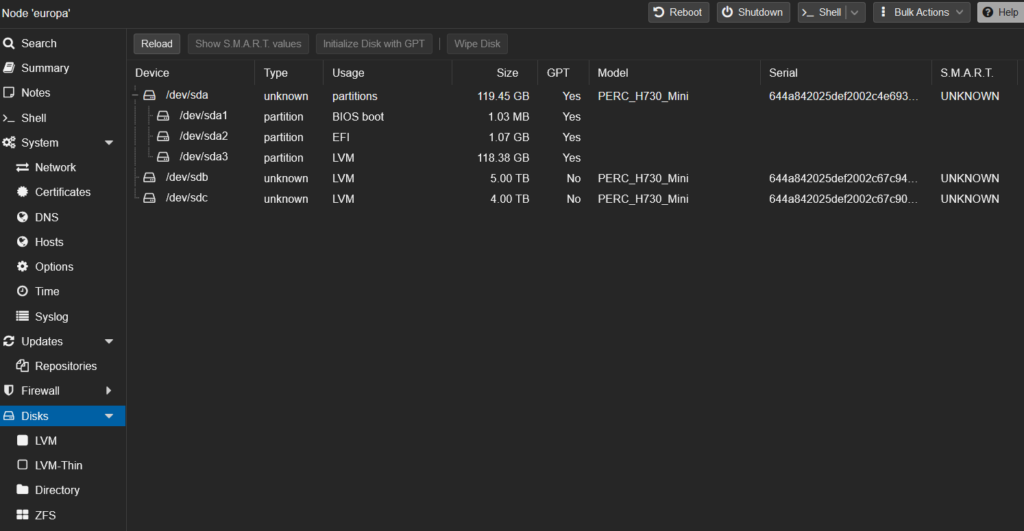
The above screenshot shows a boot drive (120GB) /dev/sda, a RAID10 array of 5TB of SSDs and 4TB of HDD.
I typically assign LVM-Thin volumes to make the best use of my storage, as can be seen below: –
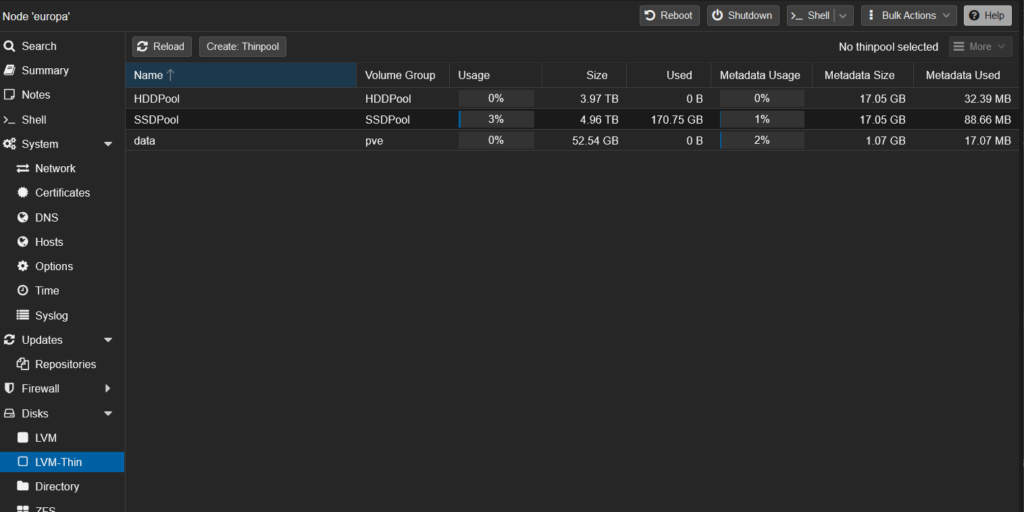
I also named the HDD disks HDDPool and SSD disks SSDPool. I can then ensure SSDs are used to keep my services as fast as possible. By naming these pools with the same names across my servers, you can move things from one server to another, and everything moves to the same type of disks as they go.
Remote Storage / Shares
As I run several different Proxmox servers, I want to be able to use a shared copy of the ISOs, Templates and Backup Locations across all of them. To do this, I have a separate TrueNAS server with a bunch of HDDs in RAID10 in it. There are several pools, each with an SSD for Read-Caching. It has a 12Gb SAS HBA and expander card to keep things snappy. It also has 2 10Gb NICs in it, in bonded mode, to ensure I can back up multiple servers at the same time without things getting too slow. So far, it has worked well with a transfer speed of around 1Gb per second for writing and even higher when reading if the data is already in the cache.
The TrueNAS machine is backed up to a separate NAS in another building each night, and data from that NAS is sent to OneDrive whenever changes are made. To say I am a little paranoid about data backup underestimates what could be considered an illness.
I have the following NFS shares on my TrueNAS machine: –
- ISOs – where I keep installation images for many operating systems, software products, etc.
- Backups – where I store Proxmox and application-specific backups
- DisksAndTemplates – where
These shares are set up to only accept requests from my server machines. The details will be in another post and will not be covered here.
To use these shares in Proxmox, you have to add them under the ‘Datacenter’ – ‘Storage’ section as shown below: –
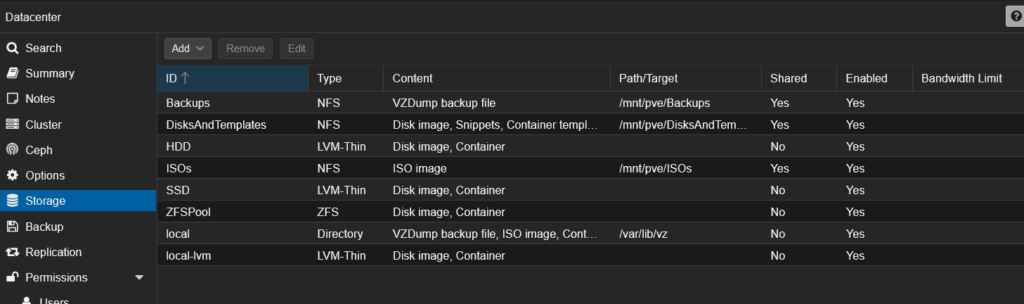
For each share, you need to click the ‘Add’ button at the top of the screen and select ‘NFS’ from the dropdown that appears. You will then be given a popup window in which to add the share as shown below: –
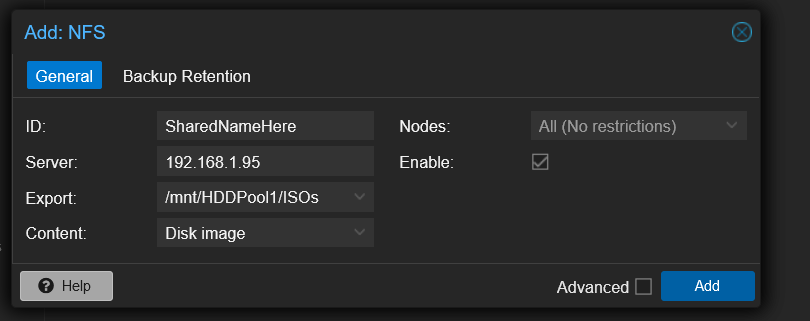
You enter the share name, the IP address or the FQDN of the TrueNAS server and select the share name in the Export DropDown.
The screenshot below shows my ISOs share: –
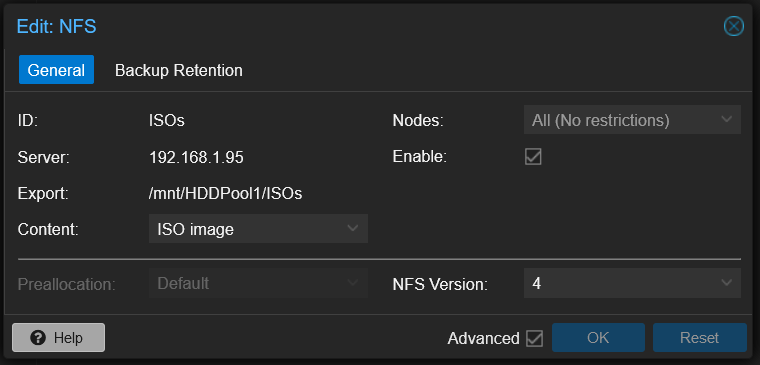
Note the ‘Advanced’ checkbox at the bottom. I check this and then select NFS Version 4.
Note the Content dropdown. This tells Proxmox what the NFS share will be used for, making this share appear in various parts of Proxmox. For example, if you set it to ISOs, it will appear in the list of available sources whenever Proxmox prompts you for an ISO image (such as when you set up a new VM). Also, note that you can select multiple items in that dropdown list to define a share as being used for more than one thing.
Update Hostnames / DNS / Gateway and more…
Most of the time, when I install Proxmox, I remember to set it up with the correct hostname and DNS settings. All of my servers have static IPs. However, from time to time, I forget to define things correctly, and so I need to update them once they are installed, so I do the following: –
Edit the file called /etc/network/interfaces and amend the following lines: –
address 192.168.1.27/24
gateway 192.168.1.1
I frequently forget to set the gateway, and then the server cannot access the internet, download updates, etc.
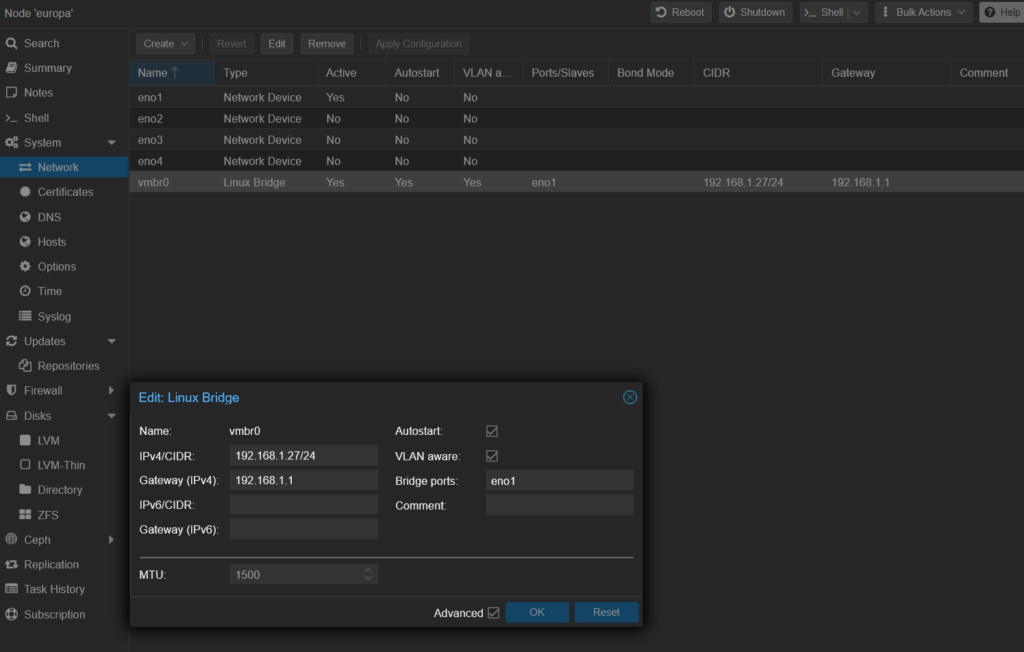
You can also make the changes within the UI by selecting the Node and clicking ‘Network’, selecting the Linux Bridge item and clicking ‘Edit. The screenshot below shows the details.

DNS settings are in the same area of the UI as shown below: –
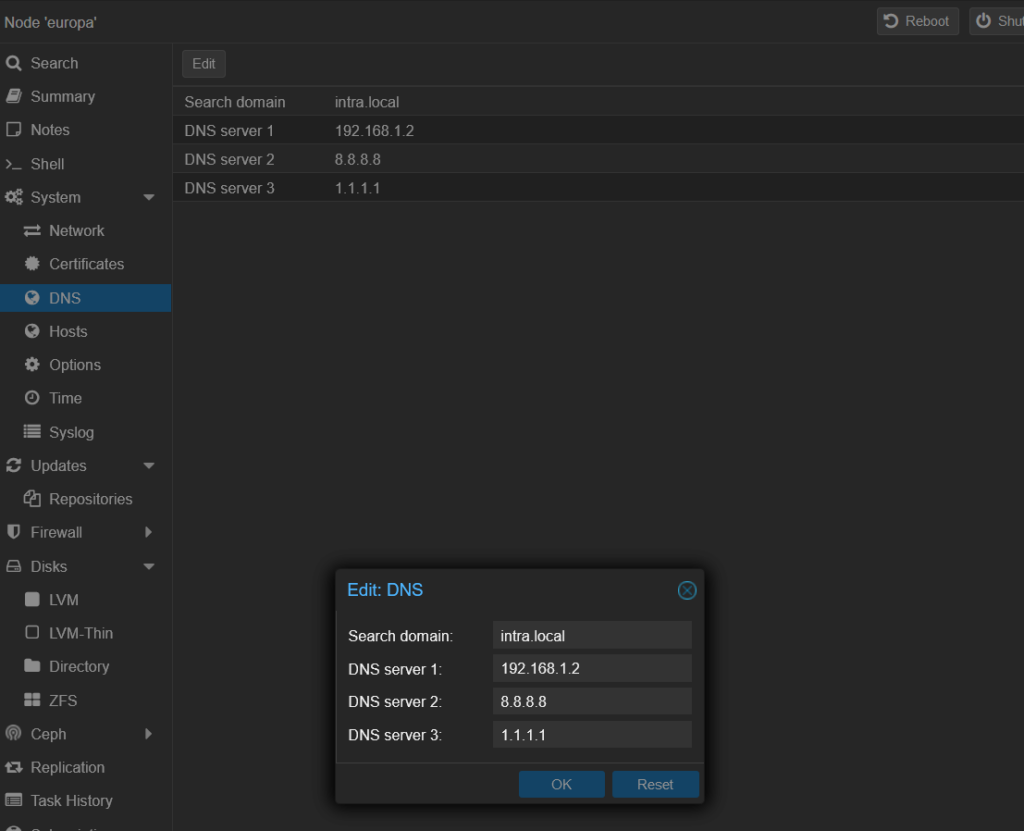
Clicking ‘Edit’ allows you to enter the domain name of your local DNS server, and I always add Google and Cloudflare’s DNS servers, too.
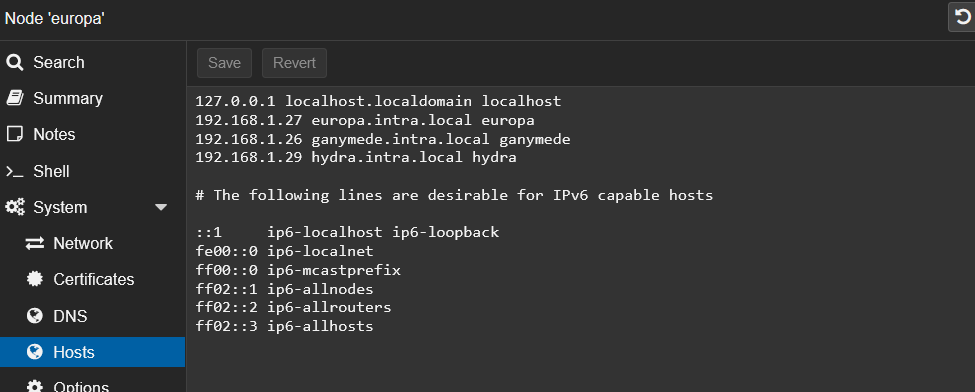
The Hosts can be edited in the UI too. The diagram below shows an example: –
You will need to reboot after making any changes to the networking side.
VLANs
This is one of the quickest things to do: –
Edit the file called /etc/network/interfaces and add the following lines or amend them if they already exist: –
bridge-vlan-aware yes
bridge-vids 1-4094
You can also make the changes within the UI by selecting the Node and clicking ‘Network’, selecting the Linux Bridge item and clicking ‘Edit. The screenshot below shows the ‘VLAN aware’ checkbox: –
You will need to reboot after making any changes to the networking side.


