Proxmox can send email alerts regarding several things, including backups, disk failures, pending updates and various other things. However, these alerts need one more thing to ensure you receive them, and that is a configured email system – it does not come with one out of the box and requires some things to be in place.
This post explains how to set up and test the email configuration on Proxmox.
If you have more than one Proxmox node, even if they are part of a cluster, you must repeat this process on each node you wish to receive alerts from.
Updating packages and installing dependencies
The first thing to do is to log into the Proxmox machine as ‘root’, update ‘apt’, and then install the first two dependencies. To do that, execute the following commands: –
apt update
apt install -y libsasl2-modules mailutils
Configure an email account on your own email system
To send emails, as with any email client like Outlook, you will need an email account. For this example, I assumed you already have an email provider and know the settings necessary to connect to, authenticate and send emails out. You will need those details to complete the next section.
Configure Postfix
We need to create a couple of files which contain the connection details to the account to which Postfix will connect to relay email out from Proxmox. Follow each step carefully: –
Create a postfix configuration file
echo "smtp.ionos.co.uk:465 your-email@gmail.com:YourAppPassword" > /etc/postfix/sasl_passwdUpdate permissions on the configuration file
chmod 600 /etc/postfix/sasl_passwdHash the file
The postmap command creates a database from the plain text file we created above. Under the hood, this file will be used by the Postfix mail client when Proxmox sends out emails.
postmap hash:/etc/postfix/sasl_passwdCheck that this created a file called /etc/postfix/sasl_passwd.db (the content should look very similar to the plain text file).
Edit the postfix config file
The standard postfix config file needs to be updated to tell it where to connect to send emails, have it access the sasl_passwd hash file, and deal with authentication. To do this, edit a file called: – /etc/postfix/main.cf
Add the following lines: –
relayhost = smtp.ionos.co.uk:465
smtp_use_tls = yes
smtp_sasl_auth_enable = yes
smtp_sasl_security_options =
smtp_sasl_password_maps = hash:/etc/postfix/sasl_passwd
smtp_tls_CAfile = /etc/ssl/certs/Entrust_Root_Certification_Authority.pem
smtp_tls_session_cache_database = btree:/var/lib/postfix/smtp_tls_session_cache
smtp_tls_session_cache_timeout = 3600
smtp_tls_wrappermode = yes
smtp_tls_security_level = encrypt
Within the existing /etc/postfix/main.cf file, there will probably be existing lines for the following items; comment these out by adding a ‘#’ at the front of the line.
Also, note the last two lines in the example above. For Ionos, their email server sent messages back to the Postfix client explaining that these lines were needed for the two systems to communicate correctly. These may not be necessary for your configuration, depending on the systems you are accessing.
#mydestination = $myhostname, localhost.$mydomain, localhost
#relayhost =
Reload the postfix configuration by
postfix reloadSend a test message and debug problems
Once everything above is complete, it ‘should’ be possible to send a test message from your Proxmox server. To do this, execute the following command: –
echo "This is a test message sent from postfix on my Proxmox Server" | mail -s "Test Email from Proxmox" your-email@gmail.comThen, check to see if the text email appears within your email client. In my case, until I added the following lines to my main.cf file, postfix and the smtp_tls_wrappermode = yes and smtp_tls_security_level = encrypt lines, I was unable to send email.
There is a lot of documentation, blog posts and forum posts about problems with sending emails, and most of it is well out of date (as this post will be as things change) – literally nothing worked for me. However, it is possible, with Proxmox 8, to see what is happening when you try to send emails by using the following command: –
journalctl -fThis shows log messages as they occur on Proxmox.
By viewing the messages that appeared from this command and by using the send mail command above, I was able to determine what was happening. Once I added the two additional configuration lines and issued another ‘postfix reload’ command, all of the queue emails were sent to my email server, authenticated and then sent to my email account.
In my case, when I ran these commands from SSH, I received an email from my email provider saying that the From Address was wrong. I completed the email address updates below and still received the same error. However, when I ran backups and specified an email address to send the results to, it worked!
Update Proxmox email addresses
The next thing we need to do is configure a couple of email addresses within Proxmox itself.
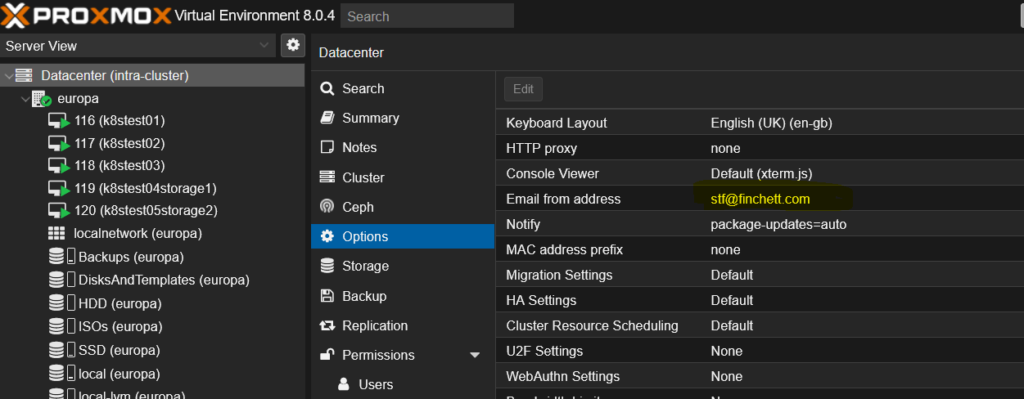
The screenshot below shows the first place we need to change. Select ‘DataCenter’ from within Proxmox, click on the ‘Email From’ item, and click the ‘Edit’ button. Change this to your email address.

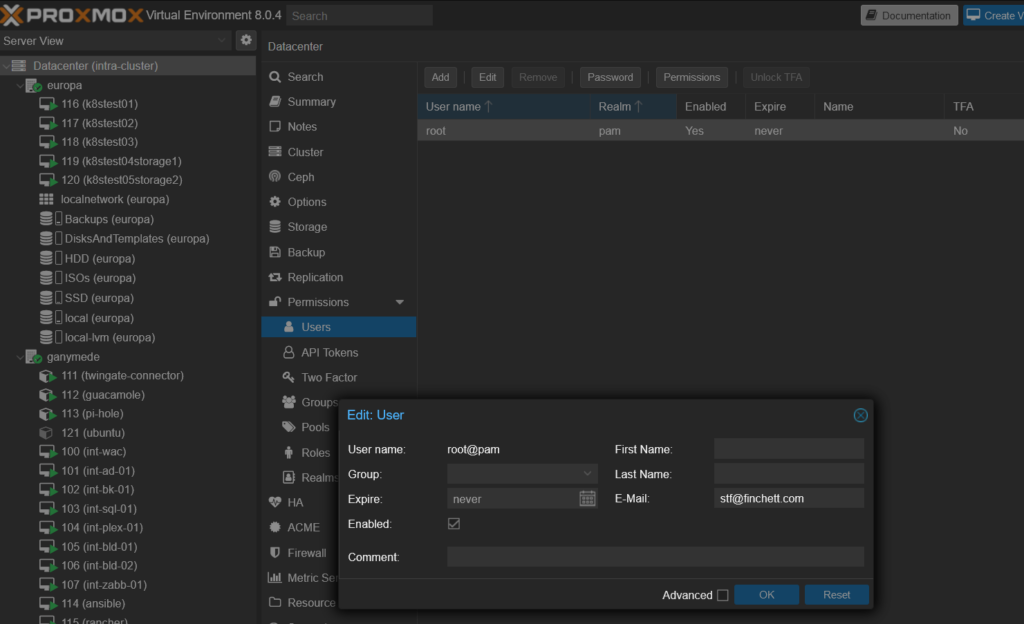
The next email address to change is the email address for your root user. When things go wrong, Proxmox sends email alerts to the email address associated with the root user.
To change the root user, again select ‘Datacenter’, ‘Users’, select the root user and click the ‘Edit’ button as shown below: –

Proxmox sends various emails to this address.
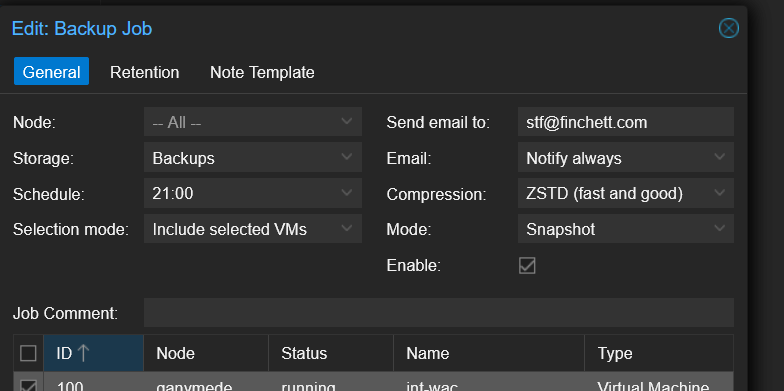
Backups are another area where you can and should specify an email address so you can be informed of the status of backups. The screenshot below shows one such area: –

You can find the official documentation for libsas2 here: – https://www.cyrusimap.org/sasl/


