
Over the years, I have used several different VPNs, both at work and for my home network. Most have worked well enough, but they all force all traffic through the VPN whether it needs to go through there or not. In most cases, this isn’t much of a problem, but it does mean more traffic goes through the VPN than is strictly necessary. The worst part is that once you are ‘on the network’, you can jump from one machine to another.
Twingate is different: –
Benefits of using Twingate
Twingate
- Modern security. Control access to corporate resources at the application level vs. at the network level, which reduces the risk of lateral movement attacks. Twingate’s architecture eliminates the need to have a public-facing gateway, so your network and resources stay hidden.
- Easy setup and rapid deployment. Twingate can be deployed in under 15 minutes with a lightweight connector component deployed on a single host within the network. There is no hardware to procure or network configurations to change. Twingate integrates with popular Identity Providers like Okta, JumpCloud, Azure AD, OneLogin and Google for a fast end-user rollout, and also offers a centralized admin console to provision and manage access.
- Fast performance for distributed work. Unlike VPNs that are “full tunnel”, meaning all traffic is indiscriminately passed through a VPN gateway and into a corporate network, Twingate is “split tunnel” by default, meaning only traffic that needs to reach internal resources are routed to the corporate network.
So, I decided to give it a try.
Installation
The only thing you need to do before you start the installation process is sign up for a Twingate account. This is nice and easy and, if you are a home-labber, it is free.
As part of this process, you give your network a name on the Twingate domain – mine is intra.twingate.com.
Once this is setup, you then follow the ‘first time set up guide’ here: – https://www.twingate.com/docs/quick-start
I installed the ‘connector’ in a Linux Container on one of my Proxmox servers. I created a new container and used the standard Proxmox Ubuntu server ISO. The connector has very low resource requirements, so I set the container up with just 512Mb of RAM, 1 CPU core and 8GB of disk.
The Linux Client requires either systemd-resolved service to be enabled/running or NetworkManager service to be configured and enabled/running as the client DNS service.
I then followed the instructions at: – https://www.twingate.com/docs/quick-start#deploy-a-connector
The basic process is that you select an installation method and follow the instructions given. For Linux, this involves running a script with your API keys inside it. This installs the connector and registers it with Twingate.
As Twingate release updates, they send emails and ask that you upgrade your connectors. This is really easy for Linux, and you log into the container as root and run the following commands: –
sudo apt update
sudo apt install -yq twingate-connector
sudo systemctl restart twingate-connector
These instructions can be found on the following page: – https://www.twingate.com/docs/systemd-service
Once the service is restarted, it connects to the Twingate servers and tells them the version number.
Twingate has a service status page here: – https://status.twingate.com
This shows the status of the Twingate servers and services with details regarding problems, when they occurred and were fixed, etc.
One really cool feature is that you can navigate to ‘yourname.twingate.com’ address in a browser to access your network control area. So, for me, I access https://intra.twingate.com. This is very handy!
Users
One of the great features of Twingate is that you decide who can access what by setting up services and users and defining which services users can see/access. For me, I am the only user who needs to access my home services whilst away from home, so I only set up one user, and I am the ‘admin’.
Resources
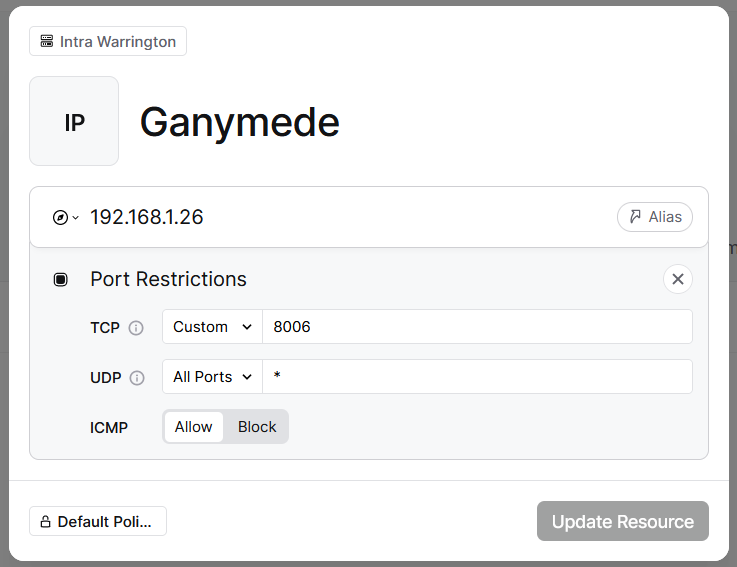
To access servers and services on your network, you add Resources within Twingate.
The screenshot below shows a new resource being edited – note the network selected at the top of the form – this isn’t particularly clear, and if you don’t select the network, you can’t add the resource.
Client Application Installation
Users access the Twingate network using a client application installed on their devices. I use a Windows Laptop and a MacBook Air – so I installed two client applications.
For both the Windows and Mac installers, you visit the get.twingate.com website, and you are redirected to the right page. For Mac, if you have an Apple ID configured on your device, search for “Twingate” in the Mac App Store or go to get.twingate.com to be redirected automatically. This is a nice feature.
Once the installer is downloaded, you run it, accept the licensing agreement and click install. It installs the application, and then the installer forces you to restart your system for the networking side of the installation to take place.
When your machine restarts, the installation continues, and you are presented with a screen that looks like this: –
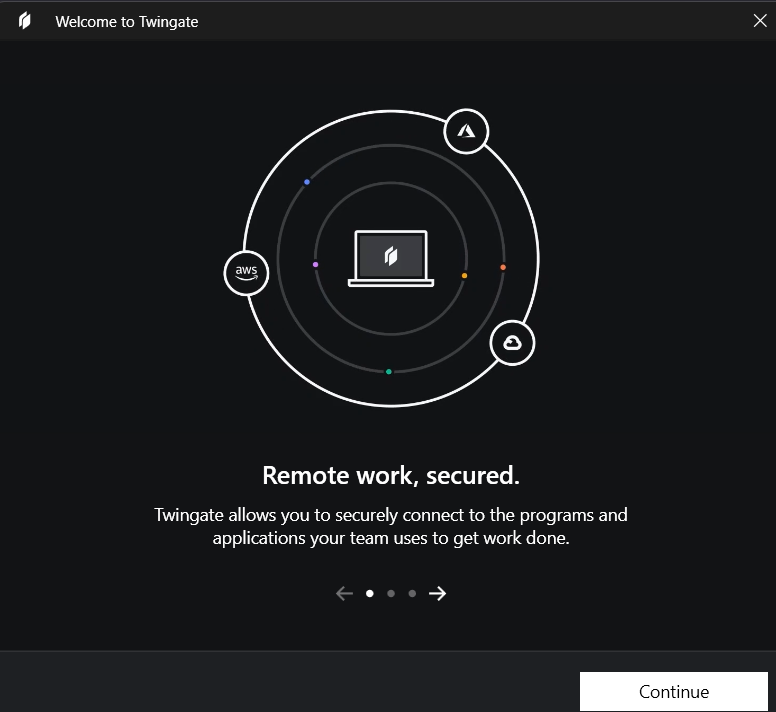
When you click ‘Continue’, you type in the name of your Twingate network – in my case intra.twingate.com – and sign in using whatever account was used to register with Twingate. In my case, I used my normal, personal Microsoft Account.
When you are out and about and unable to access your local network, you launch the Twingate client application and use its features to access the services you have defined. The client displays a small menu listing the available options. When one is selected, you are prompted to authenticate with Twingate’s servers using your normal authentication methods. Once you are authenticated, you have access to the services.


