
Over the last few years, my family and I have noticed that our electricity supply isn’t as reliable as it used to be. We have seen the clocks on several devices flashing, indicating that the power has gone out – even for a second or two – and effectively reset things like our cooker, microwave, bedside clocks, etc.
I run many servers and network equipment in my home office, and many of the services hosted on those servers and their traffic going through the network equipment my family depends on for our internet, TV / Movies and general quality of life. When there is a ‘blip’ or brown-out, those servers effectively have the power lead pulled from them, and the services die. Most of the time, this isn’t much of a problem, but occasionally, this has caused some servers/services to become corrupted somehow. Again, I have been able to fix these, but it is a real pain.
During lockdown, the reliability and capabilities of my home servers and networking became far more critical than ever. I was working from home and needed my equipment to be reliable. I spend several hours daily in team meetings and need everything to work. Although I couldn’t do much if there was a complete power outage for a prolonged period, I could do something about brown-outs and blips by installing a UPS.
Choosing a UPS
A long time ago, I bought a small UPS and connected it to my desktop machine and its monitor. I don’t think I bought this new; I must have picked it up as a used device from one of the computer fairs I frequented, as eBay didn’t exist then. This gave that machine about 10 minutes before its battery was used up. This was enough to enable the device to be shut down cleanly using the supplied software. At some point, its batteries died, and I stopped using it and disposed of it. Since then, I haven’t had any battery backups.
So, I was a little out of the loop with what was good or bad in the world of UPSs, so I started to look at what was available and what people were recommending. Eventually, I settled on Tripp lite 1500VA/900W SmartPro Line-Interactive 2U Rack/Tower UPS with LCD, USB, and 8 Outlets (SMX1500LCD).

This seemed like a decent UPS with a reasonable power output, but I chose it because I could order it on Amazon and have them deliver the following day – this was when we were locked down, and most suppliers were locked down, too.
Initially, I only ordered one, but I added another as the number of servers and switches grew. So, I now have two at the bottom of my server rack.
At the time, virtually all my servers were running Hyper-V Server with VM workloads. These weren’t the proper operating systems to run the software that came with the UPSs and had to be connected to the UPSs with USB cables – I didn’t want to get into passing the USB connections through to the VM as that would prevent me from moving them from one host to another. Fortunately, my storage server was running Windows Server 2019, which was always on, so I installed the software there. This software wasn’t outstanding, but with a little Powershell, I rigged up some scripts to send shutdown commands to each host machine after the power stayed out for over a few minutes. At the last minute, I shut down the storage server. This gave all VMs time to shut down before the storage server stopped.
I didn’t particularly like this solution as I couldn’t see the status of the UPSs and had to trust that everything would work. It also felt wrong to have a server monitoring the power for itself and other servers. I thought that a dedicated, low-power machine would be a better fit. However, the solution worked, so I just left it in place.
As I have blogged about elsewhere, I moved away from Hyper-V Server and even Windows Server 2019 to Proxmox and TrueNAS, so I could no longer use Powershell to shut the machines down. So, as I needed to do something new, I looked to see what options were available, and I discovered NUT – Network UPS Tools.
This is available from here: – https://networkupstools.org/
The primary goal of the Network UPS Tools (NUT) project is to provide support for Power Devices, such as Uninterruptible Power Supplies, Power Distribution Units, Automatic Transfer Switches, Power Supply Units and Solar Controllers. NUT delivers a standard protocol and tools to monitor and manage such devices and consistently name equivalent features and data points across vendor-specific protocols and connection media types.
NUT provides many control and monitoring features, with a uniform control and management interface.
It is provided as a server application, which is connected to the UPSs using either ethernet or USB cables, and a client application installed on hosts that monitor the server application.
The server application also has a small web application built in, and it looks like this: –
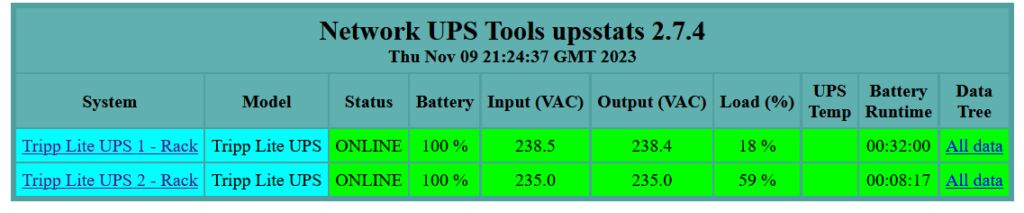
It is pretty basic, but it gives you a decent enough overview of what it is doing, battery status, and an indication of how long the batteries will last in the event of a power failure.
Hardware Choice
The NUT Server’s most outstanding feature is its very modest system requirements. It will run on virtually anything. So, as I wanted a low-power, always-on solution, I installed it on a dedicated Raspberry Pi 3B.
NUT Server Installation
Setting up the server and, to a lesser extent, the client is involved. It involves creating and editing various configuration files, setting up services, and installing a few packages onto the system if you want the web interface.
After following the instructions in one of my blog posts to set up a Raspberry Pi 3B (Setup a Raspberry Pi), I SSH’d into the Pi with the administrator account.
I then issued the following commands and rebooted the Pi: –
sudo apt update -y
sudo apt install nut nut-client nut-server
reboot
This installs most of what is needed, including a couple of utilities.
The first thing I did was to run ‘lsusb’, which lists the USB devices on a Linux machine, and it showed this: –
admin@nut:~ $ lsusb
Bus 001 Device 015: ID 09ae:2012 Tripp Lite Tripp Lite UPS
Bus 001 Device 006: ID 09ae:2012 Tripp Lite Tripp Lite UPS
Bus 001 Device 003: ID 0424:ec00 Microchip Technology, Inc. (formerly SMSC) SMSC9512/9514 Fast Ethernet Adapter
Bus 001 Device 002: ID 0424:9514 Microchip Technology, Inc. (formerly SMSC) SMC9514 Hub
Bus 001 Device 001: ID 1d6b:0002 Linux Foundation 2.0 root hub
This was a great start, as both of the UPSs installed were listed – yay!
NUT also provides a Scanner program called ‘nut-scanner’; I ran that command, and it produced the following: –
sudo nut-scanner -U

Neon library not found. XML search disabled.
IPMI library not found. IPMI search disabled.
Scanning USB bus.
[nutdev1]
        driver = "usbhid-ups"
        port = "auto"
        vendorid = "09AE"
        productid = "2012"
        product = "Tripp Lite UPS"
        vendor = "Tripp Lite"
        bus = "001"
[nutdev2]
        driver = "usbhid-ups"
        port = "auto"
        vendorid = "09AE"
        productid = "2012"
        product = "Tripp Lite UPS"
        vendor = "Tripp Lite"
        bus = "001"
admin@nut:~ $
Again, it was a great start, and I was pleased that both UPSs were the exact same models, as this would make the configuration easier than dealing with multiple make/model numbers.
The information from this step is needed in the configuration steps below.
The first configuration step is to create or edit a file called: – /etc/nut/ups.conf
My configuration file looks like this: –
pollinterval=1
maxretry=3

[trippUPS1]
        driver = usbhid-ups
        port = auto
        desc = "Tripp Lite UPS1"
        vendorid = 09ae
        productid = 2012

[trippUPS2]
        driver = usbhid-ups
        port = auto
        desc = "Tripp Lite UPS2"
        vendorid = 09ae
        productid = 2012
The names of the sections and the ‘desc’ fields are entirely user-defined. You can set these to whatever you like, but the other parts must match your UPS make and model using the details from the above step.
The next step is to edit a file called: – /etc/nut/upsmon.conf
My file looks like this: –
MONITOR trippUPS1@localhost 1 admin secret master
MONITOR trippUPS2@localhost 1 admin secret master
The ‘secret’ should be replaced with a unique password.
The next step is to edit a file called: – /etc/nut/upsd.conf
My file looks like this as I have changed the default 127.0.0.1 to 0.0.0.0 so that the server listens on all ports: –
LISTEN 0.0.0.0 3493The next configuration file to edit is called: – /etc/nut/nut.conf
My file looks like this: –
MODE=netserverI said that it was quite an involved install 🙂
The next configuration file to edit is called: – /etc/nut/upsd.users
My file looks like this: –
[monuser]
        password = secret
        admin master
The ‘secret’ has to match the password used in the uspmon.conf file.
Regarding installing the NUT Server, that’s it – or it should be – but my server kept losing connection with the USB ports / UPSs. It took quite a while to find the answer to this, but eventually, I found that I needed to create yet another configuration file as detailed below: –
The file is called: – /etc/udev/rules.d/99-nut-ups.rules and contains the following: –
SUBSYSTEM!="usb", GOTO="nut-usbups_rules_end"
# TrippLite
#  e.g. TrippLite SMART1500LCD - usbhid-ups
ACTION=="add|change", SUBSYSTEM=="usb|usb_device", SUBSYSTEMS=="usb|usb_device", ATTR{idVendor}=="09ae", ATTR{idProduct}=="2012", MODE="664", GROUP="nut", RUN+="/sbin/upsdrvctl stop; /sbin/upsdrvctl start"
LABEL="nut-usbups_rules_end"
I don’t fully understand why this is needed or what it does. It seems to stop and start the UPS driver service when it notices that it has lost contact. However, since adding this, I haven’t had any further issues.
Once all of the above configuration is complete, various services need to be restarted like this: –
sudo service nut-server restart
sudo service nut-client restart
sudo systemctl restart nut-monitor
sudo upsdrvctl stop
sudo upsdrvctl start
If you don’t want to run all these commands, just reboot the Pi.
The server is now up and running, but you can’t see anything unless you install the NUT client on other machines to check the UPS statuses or install the NUT CGI Server – I did that next.
NUT CGI Server install
The CGI server is provided as a file set that runs under ‘apache2’. This means you need to install and configure Apache and the CGI files. Fortunately, this is the easiest part of this process: –
sudo apt install apache2 nut-cgiThen a file called /etc/nut/hosts.conf needs to be created with details of the UPSs to monitor like this:
MONITOR trippups1@localhost "Tripp Lite UPS 1 - Rack"
MONITOR trippups2@localhost "Tripp Lite UPS 2 - Rack"
Note the @localhost in the above text. This is because the CGI server is installed on the same machine the NUT server is running.
The next few steps are needed to finish the apache2 server setup and allow it to run the CGI files.
sudo a2enmod cgi
sudo systemctl restart apache2
After that, a file called: /etc/nut/upsset.conf needs to have a specific literal placed into it to tell Apache2 that it can run the CGI files.
I_HAVE_SECURED_MY_CGI_DIRECTORYThat is the only line needed in the file. After that, I restarted the Apache server with: –
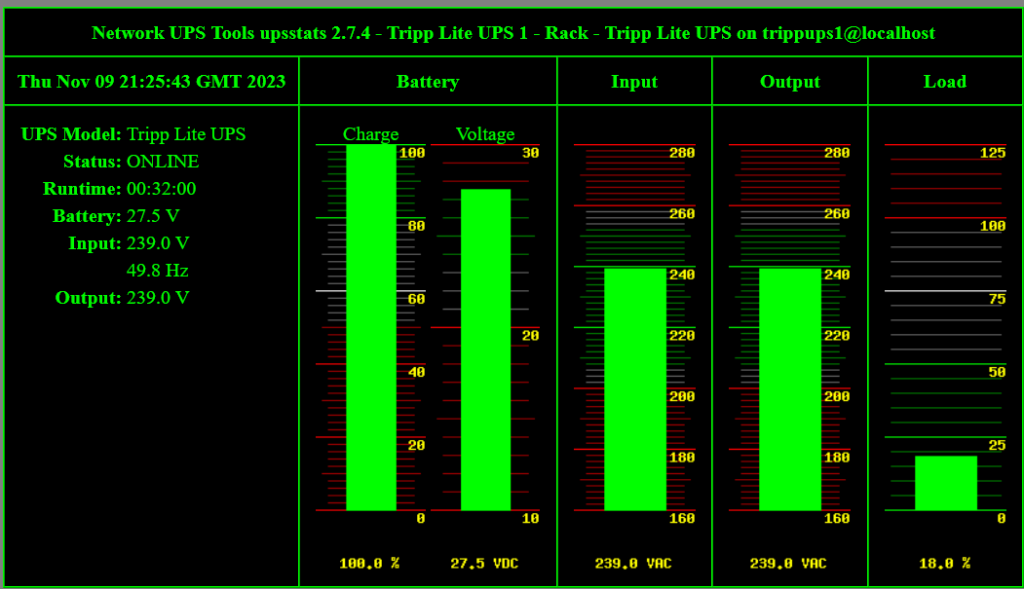
sudo systemctl restart apache2After restarting the service, I could access the dashboard by accessing the following URL in a browser: –
HTTP://192.168.1.81/cgi-bin/nut/upsstats.cgi

NUT Client Installation
Each step above has been to get us to the stage where we can monitor the power going out and the UPSs switching to battery mode. That was a lot of things to do! We still don’t have any way of shutting machines off gracefully.
This is where the NUT Client comes in. There are versions available for Windows, Linux, Mac and BSD, and they can be downloaded from here: – https://networkupstools.org/download.html#_binary_packages
I needed the Linux installer because my servers run Proxmox on bare metal. My TrueNAS box needed the BSD installer.
Fortunately, installing the client on Linux is really simple, and you run: –
sudo apt install nut-clientOnce this is complete, a new command is available called ‘upsc’ that is used to connect to the UPSs being monitored and display their status: –
root@ganymede:~# upsc trippups1@192.168.1.81
Init SSL without certificate database
battery.charge: 100
battery.runtime: 2310
battery.type: PbAC
battery.voltage: 27.5
battery.voltage.nominal: 24.0
device.mfr: Tripp Lite
device.model: Tripp Lite UPS
device.type: ups
driver.name: usbhid-ups
driver.parameter.pollfreq: 30
driver.parameter.pollinterval: 1
driver.parameter.port: auto
driver.parameter.productid: 2012
driver.parameter.synchronous: no
driver.parameter.vendorid: 09ae
driver.version: 2.7.4
driver.version.data: TrippLite HID 0.82
driver.version.internal: 0.41
input.frequency: 49.9
input.voltage: 240.5
input.voltage.nominal: 230
output.frequency.nominal: 50
output.voltage: 240.4
output.voltage.nominal: 230
ups.beeper.status: enabled
ups.delay.shutdown: 20
ups.load: 16
ups.mfr: Tripp Lite
ups.model: Tripp Lite UPS
ups.power: 0.0
ups.power.nominal: 1500
ups.productid: 2012
ups.status: OL
ups.timer.reboot: 65535
ups.timer.shutdown: 65535
ups.vendorid: 09ae
ups.watchdog.status: 0
Note the name@ipaddress. The name is the name given to the UPS in the /etc/nut/ups.conf file that was edited earlier – the name in the square brackets. I have two UPSs, so I can see the other one by changing the name to trippUPS2.
So far, so good; the client can see the server and access the status of each UPS, but we still haven’t set up a way for the client to shut the server down in case of a power outage.
Configuring the client has a few steps but not as many as the server.
The first step is to set this instance as a client by editing a configuration file called /etc/nut/nut.conf
There is only one line needed, and that is: –
MODE=netclientThe next file that needs to be edited is: – /etc/nut/uspmon.conf
RUN_AS_USER root

MONITOR trippups2@192.168.1.81 1 admin secret slave

MINSUPPLIES 1
SHUTDOWNCMD "/sbin/shutdown -h"
NOTIFYCMD /usr/sbin/upssched
POLLFREQ 2
POLLFREQALERT 1
HOSTSYNC 15
DEADTIME 15
POWERDOWNFLAG /etc/killpower

NOTIFYMSG ONLINE    "UPS %s on line power"
NOTIFYMSG ONBATT    "UPS %s on battery"
NOTIFYMSG LOWBATT   "UPS %s battery is low"
NOTIFYMSG FSD       "UPS %s: forced shutdown in progress"
NOTIFYMSG COMMOK    "Communications with UPS %s established"
NOTIFYMSG COMMBAD   "Communications with UPS %s lost"
NOTIFYMSG SHUTDOWN  "Auto logout and shutdown proceeding"
NOTIFYMSG REPLBATT  "UPS %s battery needs to be replaced"
NOTIFYMSG NOCOMM    "UPS %s is unavailable"
NOTIFYMSG NOPARENT  "upsmon parent process died - shutdown impossible"

NOTIFYFLAG ONLINE   SYSLOG+WALL+EXEC
NOTIFYFLAG ONBATT   SYSLOG+WALL+EXEC
NOTIFYFLAG LOWBATT  SYSLOG+WALL
NOTIFYFLAG FSD      SYSLOG+WALL+EXEC
NOTIFYFLAG COMMOK   SYSLOG+WALL+EXEC
NOTIFYFLAG COMMBAD  SYSLOG+WALL+EXEC
NOTIFYFLAG SHUTDOWN SYSLOG+WALL+EXEC
NOTIFYFLAG REPLBATT SYSLOG+WALL
NOTIFYFLAG NOCOMM   SYSLOG+WALL+EXEC
NOTIFYFLAG NOPARENT SYSLOG+WALL

RBWARNTIME 43200

NOCOMMWARNTIME 600

FINALDELAY 5
There are a lot of settings in this file. A detailed explanation of these settings can be found here: – https://github.com/networkupstools/ConfigExamples/releases/tag/book-3.0-20230319-nut-2.8.0
This tells the client to scan the server every 2 seconds and how to handle the messages it receives.
A couple of additional steps need to be completed before we are done.
The first is that a file called /etc/nut/upssched.conf needs to look like this: –
CMDSCRIPT /etc/nut/upssched-cmd
PIPEFN /etc/nut/upssched/upssched.pipe
LOCKFN /etc/nut/upssched/upssched.lock

AT ONBATT * START-TIMER onbatt 30
AT ONLINE * CANCEL-TIMER onbatt online
AT ONBATT * START-TIMER earlyshutdown 30
AT LOWBATT * EXECUTE onbatt
AT COMMBAD * START-TIMER commbad 30
AT COMMOK * CANCEL-TIMER commbad commok
AT NOCOMM * EXECUTE commbad
AT SHUTDOWN * EXECUTE powerdown
This file tells the client to start a timer of 30 seconds. When the 30 seconds have elapsed, and the battery is still being used, it should trigger the shutdown command. If the UPS changes back to be on mains power, the timer is cancelled, and the process starts again with the client scanning the server every 2 seconds.
Note lines 2 and 3 specify that a couple of lock files are located in a folder called /etc/nut/upssched. This means this folder must be created manually using the command: –
mkdir /etc/nut/upsschedLine number 1 defines the script that runs whenever there is a change in status from the server. This looks like this: –
#!/bin/sh
 case $1 in
       onbatt)
          logger -t upssched-cmd "UPS running on battery"
          ;;
       earlyshutdown)
          logger -t upssched-cmd "UPS on battery too long, early shutdown"
          /usr/sbin/upsmon -c fsd
          ;;
       shutdowncritical)
          logger -t upssched-cmd "UPS on battery critical, forced shutdown"
          /usr/sbin/upsmon -c fsd
          ;;
       upsgone)
          logger -t upssched-cmd "UPS has been gone too long, can't reach"
          ;;
       *)
          logger -t upssched-cmd "Unrecognized command: $1"
          ;;
 esac
This needs to be created and must have executable permissions – this can be done like this: –
chmod+x /etc/nut/upssched-cmdAfter creating each of the above files and changing the cmd file to be executable, the nut-client service needs to be restarted with the command: –
systemctl restart nut-clientYou can then test that everything is set up by pulling the plug on the power. Obviously, do the decent thing and shut down the VMs on the host machines because you may lose data if you don’t have things set up correctly.
If everything is set up correctly, the NUT client will send out messages to connected users, and after 30 seconds, it will shut down the server gracefully.


